2 ways of splitting multipolygons into single polygons in QGIS
Splitting multipolygons into single polygons in QGIS can be achieved using the “Multipart to Singleparts” tool. Here is a step-by-step guide:
Working in QGIS? You should be listening to our podcast!
Step-by-Step Guide to Split Multipolygons into Single Polygons
1. Load the Multipolygon Shapefile
- Go to Layer > Add Layer > Add Vector Layer.
- Browse and select your multipolygon shapefile.
- Click Add.
Step 2: Open Processing Toolbox
- Go to Processing > Toolbox.
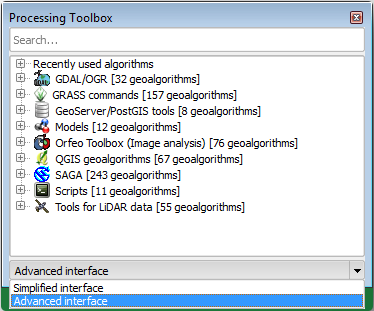
Step 3: Search for the “Multipart to Singleparts” Tool
- In the Processing Toolbox, use the search bar to find “Multipart to Singleparts”.
- Select the Multipart to Singleparts tool from the results.
Step 4: Configure the Multipart to Singleparts Tool
- Input Layer: Select your multipolygon layer from the dropdown menu.
- Output Layer: Specify the output file location and name, or keep it as a temporary layer.
Step 5: Run the Tool
- Click Run to execute the tool.
Step 6: Output Layer
- Once the process is complete, the new layer with single polygons will be added to your QGIS project.
- You can now see each polygon as a separate feature.
Additional Information
- Saving the Output Layer: If you kept the output as a temporary layer, you can save it as a new shapefile by right-clicking the layer in the Layers panel and selecting Export > Save Features As….
- Verifying the Results: Open the attribute table of the new layer to verify that the polygons have been correctly split into single features.
By following these steps, you can easily split multipolygon features into single polygons using QGIS.
Interactive way to split multipolygons into single polygons in QGIS
There is an interactive way to split multipolygons into single polygons in QGIS using the “Explode” tool available in the Advanced Digitizing Toolbar. Here’s how you can do it:
Step-by-Step Interactive Guide to Split Multipolygons into Single Polygons
Step 1: Enable the Advanced Digitizing Toolbar
- Go to View > Toolbars and ensure Advanced Digitizing Toolbar is checked.
Step 2. Load the Multipolygon Shapefile
- Go to Layer > Add Layer > Add Vector Layer.
- Browse and select your multipolygon shapefile.
- Click Add.
Step 3: Start Editing the Layer
- Select your layer in the Layers panel.
- Click the Toggle Editing button (pencil icon) on the toolbar to enable editing mode for the layer.
Step 4: Select the Explode Tool
- In the Advanced Digitizing Toolbar, find and click the Explode tool. The icon looks like a polygon being split.
Step 5: Split the Multipolygon
- Click on the multipolygon feature you want to split. The tool will interactively split the selected multipolygon into single polygon features.
Step 6: Save the Changes
- After splitting the polygons, click the Save Layer Edits button (floppy disk icon) on the toolbar to save your changes.
Step 7: Stop Editing
- Click the Toggle Editing button again to stop editing mode.
Additional Information
- Verifying the Results: After saving the edits, you can open the attribute table of the layer to verify that the polygons have been correctly split into single features.
- Undo Edits: If you make a mistake while editing, you can use the Undo button (curved arrow icon) to revert the last action.
By following these interactive steps, you can split multipolygons into single polygons in QGIS in a more hands-on manner.
Difference Between Multi and Single Part Polygons
Single Part Polygon:
- A single part polygon is a single continuous shape with a defined boundary that does not contain any other polygons. It represents one distinct area.
- Example: A lake or a single land parcel.
Multi Part Polygon:
- A multi part polygon consists of multiple distinct polygon shapes grouped together as one feature. These shapes do not share boundaries and can be spatially disconnected from each other.
- Example: A country with multiple islands, such as Indonesia or the Philippines.
Examples of WKT (Well-Known Text)
Single Part Polygon:
POLYGON ((30 10, 40 40, 20 40, 10 20, 30 10))This WKT represents a single polygon with coordinates forming a closed loop.
Multi Part Polygon:
MULTIPOLYGON (((30 10, 40 40, 20 40, 10 20, 30 10)),
              ((15 5, 25 25, 5 25, 15 5)))
This WKT represents a multipolygon consisting of two separate polygons.
Understanding the Differences
- Visualization: Single part polygons are displayed as one continuous shape, while multi part polygons appear as multiple separate shapes that may be grouped together.
- Use Cases: Single part polygons are used for features like lakes or parks, whereas multi part polygons are used for complex features like archipelagos or geographically fragmented areas.
- Geometric Operations: Operations like area calculation or boundary extraction can differ for multi part polygons due to their multiple components.
These examples and descriptions help illustrate the fundamental differences between single and multi part polygons in GIS.
