How to Set up a Python Environment for Geospatial Programming
In a past post, we discussed the Essential Geospatial Python Libraries. Now we’ll put theory into practice with examples of geospatial Python in action. This post will lay the foundation by providing a step-by-step guide to setting up a Python environment from scratch and installing some of the most popular geospatial packages.
The steps in this guide are meant to be followed on Windows OS.
Python Package Managers
If you have familiar with Python, chances are you have heard of Conda and/or Pip. These are the two main package managers to install Python packages. The base install of Python comes with a set of core functions. If you plan on doing almost any kind of data analysis, you’ll need to install one of the many packages stored in the Python Package Index (PyPI).
Conda and Pip help maintain a stable Python environment by installing packages, installing required dependencies, and managing conflicting libraries. The main difference between the two is that Pip is focused solely on pure Python libraries stored in the Python Package Index (PyPI), whereas Conda installs packages written in any language from the Anaconda repository.
The core geospatial software library, GDAL/OGR, and a few others are written in C++ with Python binaries. It is way easier to install these libraries using Conda than Pip. For that reason, we will be sticking with Conda as our go-to package manager.
Install Anaconda
Start with a clean install
- Uninstall any previous Anaconda installations (Start>Settings>Apps)
Download Python from Anaconda and install
- Download the Python 3.x Anaconda Distribution here.
- Run the installer.
- Choose your install directory. The default is C:\ProgramData\Anaconda3. I chose C: \Anaconda3
- Check on “Add Anaconda to path environment variable”
Set Anaconda environment variables
- When the Anaconda installer is complete, check the environment variables (Start > search “Edit the system environment variables”).
- Click on “Environment Variables…”
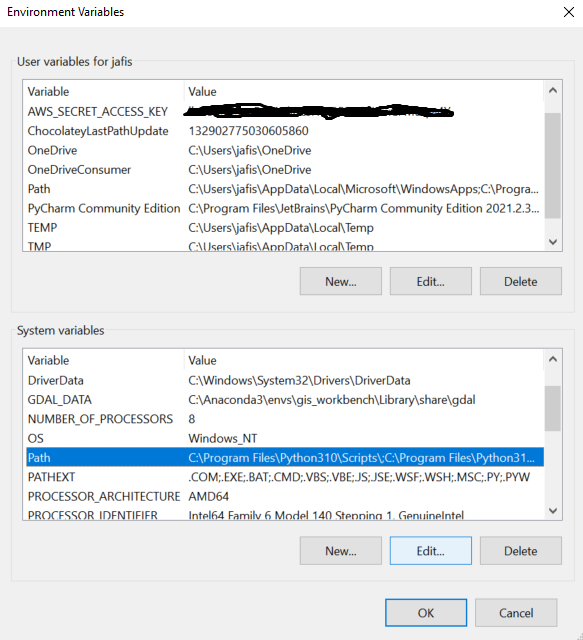
- Under “System Variables”, select “Path” then “Edit…”
- If they are not present, add the following to the Path System Variable
- C:\ProgramData\Anaconda3 (or wherever you installed Anaconda3)
- C:\ProgramData\Anaconda3\Scripts
- If they are not present, add the following to the Path System Variable

Set up Conda on the Command Line
- Open the Command Line (Start > search “cmd”) with administrator permissions. Run the following line
- “` conda init “`
- This will initialize Conda. You may need to close and re-open cmd at this step
- “` conda update -n base conda “`
- This will update your Conda version to the latest release. It will prompt you with “Proceed ([y/n])?” type “y” and press “Enter”.
- “` conda update –all “`
- This updates all the standard Python core packages. Note you need two hyphens before ‘all’. Again, it will prompt you with “Proceed ([y/n])?”. Type “y” and press “Enter”.
- “` conda info “`
- “` conda activate base “`
- “` conda init “`
See this handy cheat sheet as a reference guide to Conda functions.
Create a Virtual Environment
The last command you ran activated the Conda “base” environment. A Conda environment is a file directory that contains a specific collection of installed packages. A virtual environment is a copy of the core base environment in a separate file directory. To prevent your Conda environment from being corrupted, it is best practice to keep the base environment unchanged and install new packages in a virtual environment. Plus, when you start working with multiple different projects you’ll want multiple environments with different Python configurations.
You can see what packages are installed on the active environment by running “` conda list “` in the command line.
Run the following lines to create a new virtual environment and activate it. The environment in this example is named “gis_workbench39”, but you can name your environment whatever you wish.
- “` conda create –-name gis_workbench39 python=3.9 “`
- “` conda activate gis_workbench39 “`
Whenever you want to use or modify an environment you’ll need to activate it with the command above
Install Geospatial Packages
The GDAL repo lives on the conda-forge channel so we will use that to install most packages.
GDAL
GDAL can be a little tricky to get the installation right because it requires a bit more than simply running a command. GDAL requires a custom Windows environment variable that points to package dependencies. Luckily, you only need to do this once and it is transferrable across multiple environments.
- Run the following command to install GDAL on your virtual environment.
“` conda install -c conda-forge gdal “`
- Once the installation is complete, return to the “edit the system environment variables” window. Under “User variables” press the “New…” button to create a “GDAL_DATA” variable. Set the value to the following path:
“C:\ProgramData\Anaconda3\envs\gis_workbench39\Library\share\gdal”
- If you installed Anaconda in a different location or named your environment something else this path will be different
- Test your GDAL installation by running the following lines:
“` python “`
“` from osgeo import gdal “`
“` exit() “`
- If there are no errors, you have installed GDAL correctly! If you get errors, try confirming your environment variables, that GDAL was actually installed, then try restarting cmd.
PyProj
- PyProj also requires a custom environment variable.
“` conda install -c conda-forge pyproj “`
Create a new environment variable named “PROJ_LIB”. Set to the path “C:\ProgramData\Anaconda3\envs\gis_workbench39\Library\include\proj”
Install the Other Important Libraries
Using the base command “conda install -c conda-forge” you may install multiple packages at once. The following command will install the necessary packages for future posts where we will begin working with some openly available geospatial datasets.
- “` conda install -c conda-forge numpy pandas geopandas shapely matplotlib fiona pyarrow folium boto3 “`
Note: This step will take a while to complete. Be patient.
That’s it!
Now you’re all set to start working with geospatial vector and raster data in Python. You can extend your environment by installing one of the many other useful geospatial Python packages. Just remember to practice good environment management!
Make sure to keep an eye out for future posts where we will start diving into more examples of geoprocessing with Python.
Here are a couple of code snippets to test your environment. You can find files with the code snippets below here.
Use GDAL to open and visualize an image of New Orleans, Louisiana.
from osgeo import gdal
import numpy as np
import matplotlib.pyplot as plt
# Url to publicly available geo-image. This is an NAIP image of New Orleans, Louisiana, USA
url = “https://prd-tnm.s3.amazonaws.com/StagedProducts/NAIP/la_2015/29090/m_2909007_ne_15_1_20150430_20151019.jp2”
ds = gdal.Open(‘/vsicurl/%s’ %(url))
print(gdal.Info(ds))
# NAIP is 4 bands Red (1), Green (2), Blue (3), and IR (4)
band1 = ds.GetRasterBand(1)
band2 = ds.GetRasterBand(2)
band3 = ds.GetRasterBand(3)
# Read as numpy arrays
b1 = band1.ReadAsArray()
b2 = band2.ReadAsArray()
b3 = band3.ReadAsArray()
# Visualize the image
img = np.dstack((b1, b2, b3))
f = plt.figure()
plt.imshow(img)
plt.show()
View and plot country boundary vector data from a GeoPandas GeoDataFrame. This is simplified code from tutorials in the GeoPandas User Guide.
import pandas as pd
import geopandas as gpd
# load the country boundary vector data
world = gpd.read_file(gpd.datasets.get_path(‘naturalearth_lowres’))
# show the geodataframe
world.head()
# plot the vector data
world.plot()